DIY < $25 Halloween Witch Wreath
About the only decorating I do is the front door, other than Christmas where I go all out. So I've been eyeing some Halloween wreaths online. However, the price they want for the witch wreath was around $150 at a certain craft store. It was insane. Here is how I made my $23.99 witch wreath:
So I thought, I should price my own design out. I was originally going to do a wreath frame with some witch dress like material wrapped around it. But then Michael's had the black tinsel like wreath on sale for $4.99! I instantly thought --- this would be a great replica to the witch's outside dress material. Near this wreath in the Halloween decorations, they conveniently had witch legs --- which turned out to be the most expensive part of the entire wreath. I think I paid about $8 (they are pretty good quality though). In the halloween outfit section, there was a purple and black boa wrap and then to make the witch's hat I bought a witch's hat for a cat. Most everything was 40% off.
$4.99 - wreath
$8 - witch's legs
$6 - witch hat
$5 - boa wrap
$23.99 total! (after coupons)
Supplies:
Tinsel wreath (12")
5' boa wrap (your color choice)
premade witch legs
old witch's hat or witch hat for pet
1 - 12"x12" black card stock
sticks (from outside!)
twine (I used cooking twine)
scissors
glue gun and sticks
Heat up glue gun. Trace the edge of the back of the wreath on the card stock. Cut the cardstock in a circle then cut off one end so the wreath hook can easily slide through when you hang it.
Flip the wreath over so you're looking at the front. Put hot glue on the inside and all over the cardstock that is visible. Slowly and carefully, press the boa wrap and legs into the glue. It doesn't have to be perfect, but just enough so it looks like it's the underneath of the witch's dress. Make sure all the boa is glued down. Add more if needed.
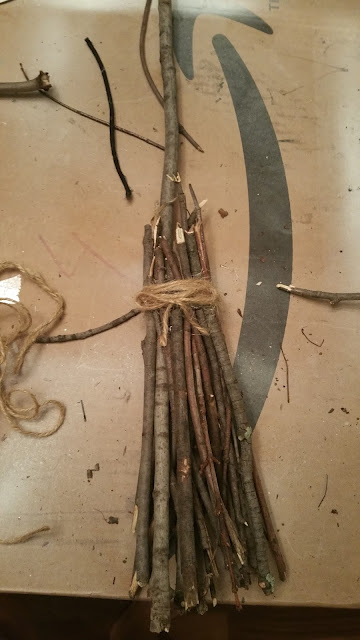
If you haven't already, go outside and pick up a rather large stick (1/2 inch thick) and then a bunch of kindling or small branches. Break the small branches so they are all the same length (about 5" long). Place them up against the large branch.
Get a hair tie and wrap it around the sticks to keep in place. You only need to wrap once. Hot glue the sticks together and up against the large branch.
In one hand have the twine, with the other hand add a dot of hot glue on one area of the small branches, place the middle of the twine on that dot. Tightly wrap and wrap the twine until the sticks are tied together. Before you knot it and add a bow, add a line of hot glue. Carefully press it down, tie the knot and add the bow. I even added a dot of glue for each curve of the bow and loose twine.
Now because my big branch was rather large, I ended up breaking the end off and gluing it to the end to look like it broke as it hit the door.
On October 1st, mine will be proudly hung like shown below. ENJOY! And Happy HALLOWEEN!
*Sorry for the horrible pictures. I rarely have time to blog nowadays, so I quickly snapped these.


Comments
Post a Comment